> ## Documentation Index
> Fetch the complete documentation index at: https://docs.livepeer.org/llms.txt
> Use this file to discover all available pages before exploring further.
# On-chain Setup
Contract addresses in this guide may be outdated. For current verified addresses, see:
**[Livepeer Contract Addresses](/v2/about/resources/livepeer-contract-addresses)**
The previous section covered the **off-chain** configuration of the AI
Orchestrator node. This section details how to connect an AI Orchestrator node
to the Livepeer AI network and earn fees for processing AI inference jobs.
## Prerequisites
* An established [Mainnet Orchestrator](/orchestrators/guides/get-started)
within the Top 100 on the Livepeer network
* A dedicated static IP address or domain name for your AI Orchestrator node
* An Ethereum wallet funded with enough ETH to cover transaction fees for ticket
redemption
## Ensure you can Redeem Tickets
The Livepeer AI network is currently in **Beta** but is already integrated into
the main [go-livepeer](https://github.com/livepeer/go-livepeer) software.
However, it still uses a separate port for the AI Orchestrator. This means that
your **Mainnet Transcoding Network Orchestrator** is currently unable to
directly redeem AI-related tickets. There are two methods to enable your AI
Orchestrator node to redeem tickets:
To enable ticket redemption for your **AI Orchestrator**, set the ticket recipient to your **Mainnet Transcoding Network Orchestrator**'s Ethereum address. This method allows the earned fees to be credited directly to your main Orchestrator without requiring additional setup or causing disruption.
For security, it's advised to use a separate account from your **Mainnet Transcoding Network Orchestrator**.
Create a new Ethereum wallet for your **AI Orchestrator**. Follow the [Wallet Creation](/orchestrators/guides/get-started#automatic-eth-account-creation) guide in the [Orchestrator](/orchestrators/guides/get-started) documentation for detailed instructions.
Transfer sufficient ETH to the new wallet to cover the gas costs for redeeming AI tickets on-chain.
To direct the fees earned by your AI Orchestrator to your main Orchestrator, set the ticket recipient as the Ethereum address of your main Orchestrator. This can be done by adding the following flag when launching your AI Orchestrator node:
```bash theme={"theme":{"light":"github-light","dark":"dark-plus"}}
./livepeer \
-ethOrchAddr \
... \
```
While this method is possible, it's not recommended because it can disrupt performance and add complexity to your **Mainnet Transcoding Network Orchestrator**. Only proceed with this method if you are unable to create a separate wallet for your **AI Orchestrator** and understand the potential implications.
If creating a separate wallet for your **AI Orchestrator** isn't an option, you might want to use a [redemption service](https://github.com/livepeer/go-livepeer/blob/master/doc/redeemer.md). This service allows your **Mainnet Transcoding Network Orchestrator** to redeem tickets for your AI Orchestrator. For more details, check out the [redemption service documentation](https://github.com/livepeer/go-livepeer/blob/master/doc/redeemer.md) and the [go-livepeer CLI documentation](/references/go-livepeer/cli-reference#onchain).
## Advertising Your AI Service URI
To make your AI Orchestrator node discoverable by AI Gateway nodes on the
Livepeer AI network, you need to advertise your **AI service URI** on-chain. You
can do this by registering your service URI with the
[AIServiceRegistry](https://arbiscan.io/address/0x04C0b249740175999E5BF5c9ac1dA92431EF34C5)
contract on the [Arbitrum Mainnet](https://arbitrum.io).
The easiest and recommended method is to use the [Foundry](https://book.getfoundry.sh/getting-started/installation) smart contract deployment toolchain.
Install [Foundry Cast](https://book.getfoundry.sh/cast/) by executing the following commands in your terminal:
```bash theme={"theme":{"light":"github-light","dark":"dark-plus"}}
curl -L https://foundry.paradigm.xyz | bash
source /home//.bashrc
foundryup
```
No need to move your **Mainnet Transcoding Network Orchestrator** wallet. You can run Foundry Cast and register your AI Orchestrator from any machine.
Set your Service URI, ensuring it starts with `https://`, using the `SetServiceURI` function on the [AIServiceRegistry](https://arbiscan.io/address/0x04C0b249740175999E5BF5c9ac1dA92431EF34C5) contract. Use the KeyStore file and password from your **Mainnet Transcoding Network Orchestrator** wallet:
```bash theme={"theme":{"light":"github-light","dark":"dark-plus"}}
cast send --keystore '' --password '' --rpc-url 0x04C0b249740175999E5BF5c9ac1dA92431EF34C5 "setServiceURI(string)" https://:
```
After successful execution, the output should look like this:
```bash theme={"theme":{"light":"github-light","dark":"dark-plus"}}
blockHash: 0x214a65d2dffd1732e971bd3662dcb681663c2eb0c95a33c8918bab0a44e2d3ed
blockNumber: 200370198
```
Verify your Service URI by invoking the `getServiceURI` function on the [AIServiceRegistry](https://arbiscan.io/address/0x04C0b249740175999E5BF5c9ac1dA92431EF34C5) contract:
```bash theme={"theme":{"light":"github-light","dark":"dark-plus"}}
cast call --rpc-url 0x04C0b249740175999E5BF5c9ac1dA92431EF34C5 "getServiceURI(address)" | xxd -r -p
```
If successful, the output should be:
```bash theme={"theme":{"light":"github-light","dark":"dark-plus"}}
https://:
```
Congratulations! Your **AI Orchestrator** node is now discoverable by **AI Gateway** nodes and ready to execute AI inference tasks on the Livepeer AI network! 🚀
If you prefer to interact with the contract through your browser, use the [Arbitrum Explorer](https://arbiscan.io/address/0x04C0b249740175999E5BF5c9ac1dA92431EF34C5) to call the `setServiceURI` function on the [AIServiceRegistry](https://arbiscan.io/address/0x04C0b249740175999E5BF5c9ac1dA92431EF34C5) contract.
Import the Ethereum wallet associated with your **Mainnet Transcoding Network Orchestrator** into your wallet browser extension. The steps to import your wallet may vary depending on the extension you are using. The steps for MetaMask can be found [here](https://support.metamask.io/hc/en-us/articles/360015489331-How-to-import-an-account).
Visit the [AIServiceRegistry](https://arbiscan.io/address/0x04C0b249740175999E5BF5c9ac1dA92431EF34C5) contract page on the Arbitrum Explorer and click on the `Contract` tab.
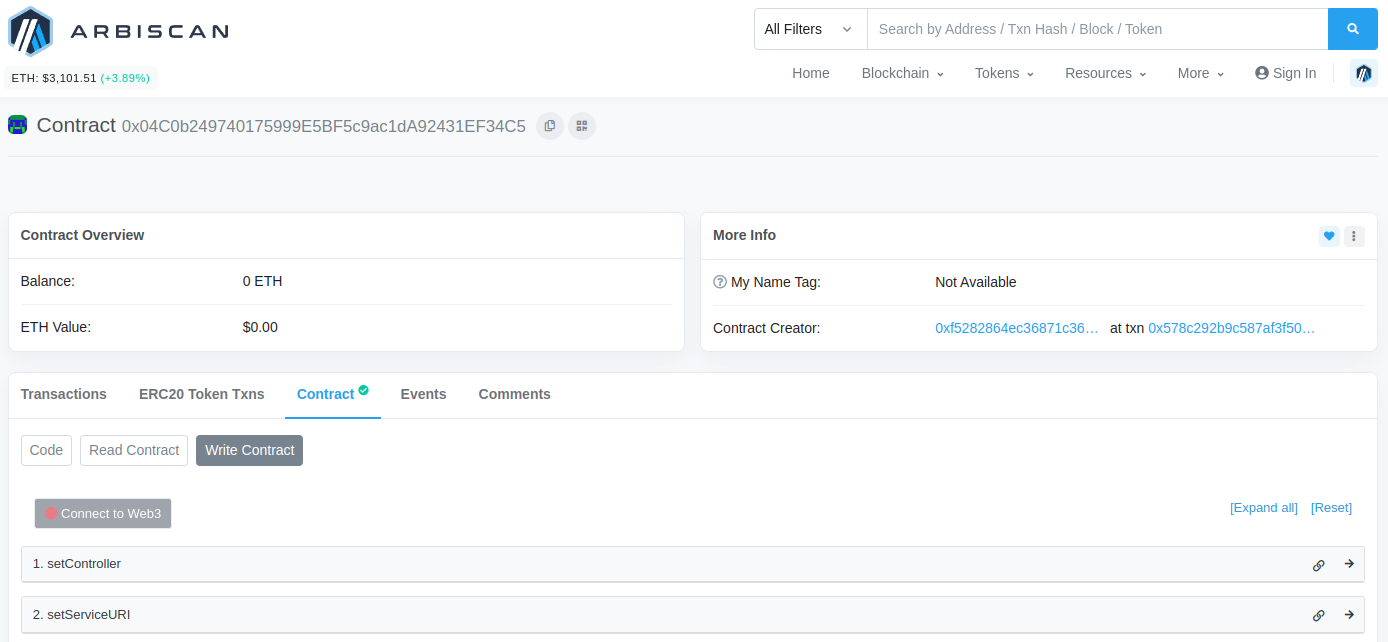 On the contract page, click the `Write Contract` button and connect your wallet to the Arbitrum Explorer by clicking the `Connect to Web3` button. Then, select the wallet you imported in the first step.
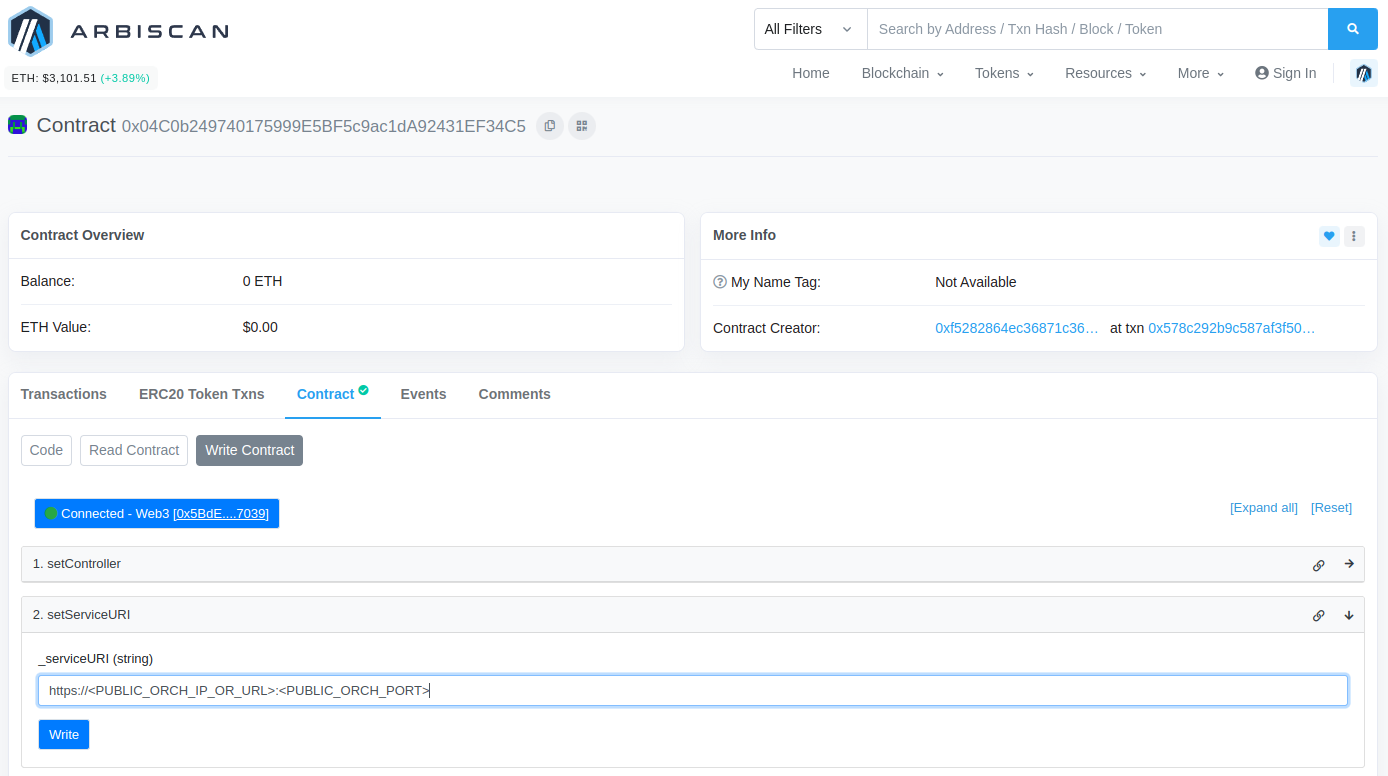
Access the [setServiceURI](https://arbiscan.io/address/0x04C0b249740175999E5BF5c9ac1dA92431EF34C5#writeContract#F2) function on the contract page and input the **Service URI** for your AI Orchestrator in the `_serviceURI` field. Make sure the Service URI starts with `https://`. After clicking the `Write` button to execute the function, you must confirm the transaction in your wallet extension. Once the transaction is confirmed, your AI Orchestrator's Service URI will
be successfully set.
On the contract page, click the `Write Contract` button and connect your wallet to the Arbitrum Explorer by clicking the `Connect to Web3` button. Then, select the wallet you imported in the first step.
Access the [setServiceURI](https://arbiscan.io/address/0x04C0b249740175999E5BF5c9ac1dA92431EF34C5#writeContract#F2) function on the contract page and input the **Service URI** for your AI Orchestrator in the `_serviceURI` field. Make sure the Service URI starts with `https://`. After clicking the `Write` button to execute the function, you must confirm the transaction in your wallet extension. Once the transaction is confirmed, your AI Orchestrator's Service URI will
be successfully set.
 To verify that the Service URI has been set correctly, click the `Read Contract` button on the contract page. Access the [getServiceURI](https://arbiscan.io/address/0x04C0b249740175999E5BF5c9ac1dA92431EF34C5#readContract#F2) function and input the address of your **Mainnet Transcoding Network Orchestrator** in the `_addr` field. Click the `Query` button to retrieve the Service URI set for your AI Orchestrator.
Congratulations! Your AI Orchestrator node is now discoverable by **AI Gateway** nodes and ready to execute AI inference tasks on the Livepeer AI network! 🚀
Currently, setting your AI service URI using the Livepeer CLI is not supported during the **Beta** phase of the Livepeer AI network. This feature is planned for future releases.
## Launch your On-chain AI Orchestrator
Once you've set your AI service URI on-chain, you can launch your AI
Orchestrator node to start processing AI inference jobs on the Livepeer AI
network. The commands to start the AI Orchestrator are similar to those for the
[off-chain Orchestrator](/ai/orchestrators/start-orchestrator), but with
additional flags to enable on-chain functionality:
* `-AIServiceRegistry`: Ensures that the Orchestrator is connected to the
Livepeer AI network.
* `-network=arbitrum-one-mainnet`: Connects the AI Orchestrator node to the
Arbitrum Mainnet network.
* `-ethUrl=https://arb1.arbitrum.io/rpc`: Sets the Arbitrum Mainnet RPC URL. You
can replace this with your own RPC URL.
* `-ethKeystorePath=/root/.lpData/arbitrum-one-mainnet/keystore`: Sets the path
to the AI Orchestrator's Ethereum keystore file.
* `-ethAcctAddr `: Sets the Ethereum address of the AI
Orchestrator.
* `-ethPassword=/root/.lpData/.eth_secret`: Sets the Ethereum keystore password
file path.
* `-ethOrchAddr=`: Sets the Ethereum address of the
Mainnet Transcoding Network Orchestrator.
Due to current limitations in the Livepeer AI software, the following flag is
required:
* `-ticketEV=2999999999999`: This flag ensures that the AI Orchestrator doesn't
trigger maximum ticket limits set by the `go-livepeer` software.
To verify that the Service URI has been set correctly, click the `Read Contract` button on the contract page. Access the [getServiceURI](https://arbiscan.io/address/0x04C0b249740175999E5BF5c9ac1dA92431EF34C5#readContract#F2) function and input the address of your **Mainnet Transcoding Network Orchestrator** in the `_addr` field. Click the `Query` button to retrieve the Service URI set for your AI Orchestrator.
Congratulations! Your AI Orchestrator node is now discoverable by **AI Gateway** nodes and ready to execute AI inference tasks on the Livepeer AI network! 🚀
Currently, setting your AI service URI using the Livepeer CLI is not supported during the **Beta** phase of the Livepeer AI network. This feature is planned for future releases.
## Launch your On-chain AI Orchestrator
Once you've set your AI service URI on-chain, you can launch your AI
Orchestrator node to start processing AI inference jobs on the Livepeer AI
network. The commands to start the AI Orchestrator are similar to those for the
[off-chain Orchestrator](/ai/orchestrators/start-orchestrator), but with
additional flags to enable on-chain functionality:
* `-AIServiceRegistry`: Ensures that the Orchestrator is connected to the
Livepeer AI network.
* `-network=arbitrum-one-mainnet`: Connects the AI Orchestrator node to the
Arbitrum Mainnet network.
* `-ethUrl=https://arb1.arbitrum.io/rpc`: Sets the Arbitrum Mainnet RPC URL. You
can replace this with your own RPC URL.
* `-ethKeystorePath=/root/.lpData/arbitrum-one-mainnet/keystore`: Sets the path
to the AI Orchestrator's Ethereum keystore file.
* `-ethAcctAddr `: Sets the Ethereum address of the AI
Orchestrator.
* `-ethPassword=/root/.lpData/.eth_secret`: Sets the Ethereum keystore password
file path.
* `-ethOrchAddr=`: Sets the Ethereum address of the
Mainnet Transcoding Network Orchestrator.
Due to current limitations in the Livepeer AI software, the following flag is
required:
* `-ticketEV=2999999999999`: This flag ensures that the AI Orchestrator doesn't
trigger maximum ticket limits set by the `go-livepeer` software.