> ## Documentation Index
> Fetch the complete documentation index at: https://docs.livepeer.org/llms.txt
> Use this file to discover all available pages before exploring further.
# Engagement via API
> Learn how to check out viewer engagement on Livepeer
Livepeer offers detailed information on viewer behavior and playback quality on
your platform. The API includes engagement metrics such as view counts and watch
time, as well as performance metrics such as error rate, time to first frame,
rebuffer ratio, and exit-before-starts across a variety of dimensions.
### Realtime Viewership
Please note that in order to use Realtime Viewership metrics, you need to use
Player SDK `@livepeer/react` version 4.2.0 or higher.
This API includes real-time metrics about the ongoing livestream or VOD
engagement:
* Viewer Count: The number of viewers currently watching the stream (or VOD).
* Error Rate: This metric helps to understand the number of errors that viewers
are experiencing while watching the stream (or VOD).
### Usage Metrics
This API includes usage metrics to help you understand how viewers are engaging
with your platform:
* Number of Views: This metric gives you a comprehensive view of the total
number of views across your platform. We colloquially define a view as “play
intent”, which means the video either played, stalled, or encountered an
error.
* Minutes of Watch Time: Measure the total amount of time viewers spend on your
platform, so you can track engagement and identify areas for improvement.
Please note that data is refreshed every 5 minutes and newly uploaded videos
may take up to an hour before viewership data is available
### Performance Metrics
This API offers several key performance metrics to help you understand your
platforms performance:
* Error Rate: Percentage of views that encountered an error.
* Time to First Frame (TTFF): Measures the time in milliseconds it takes between
the player requesting video and the first frame being ready to play.
* Rebuffer Ratio: Percentage of time a viewer spends experiencing rebuffering
during playback.
* Exit Before Starts: Percentage of views that are abandoned before the video
begins to play, potentially indicating issues with playback.
Please note that data is refreshed every 5 minutes and newly uploaded videos
may take up to an hour before viewership data is available
### Dimensions
To provide a comprehensive view of viewer behavior, our data product includes
several dimensions to help you segment your data and identify patterns:
* Video: View metrics for individual videos, queryable by playback ID or by
dStorage ID’s, such as CID.
* Browser: Understand how different browsers impact viewer behavior and
performance, so you can optimize your platform for each browser type.
* Device: Understand how different devices impact viewer behavior, so you can
optimize your platform for each device type.
* OS: Understand how different operating systems impact viewer behavior, so you
can optimize your platform for each OS.
* Continent, Country, and Subdivisions: Segment your data by location to
identify regional trends and tailor your platform to local preferences.
* Time Zone: Measure viewer behavior across different time zones, so you can
optimize your platform for peak usage times.
* Time: Analyze viewer behavior across different time periods (hour, day, week,
month, year, all-time) to identify trends.
## Registering views
To collect and register viewership metrics, you first need to configure your
player. We recommend that you use the [Livepeer player](/sdks/react/player/Root)
to get viewership metrics, as it comes fully configured. You can follow the
Player guide to get started.
We also support viewership metrics for applications using custom players. In
order for metrics to be tracked by Livepeer, you will need to configure your
player using `addMediaMetrics`.
Here's how to configure your player:
Make sure you have initialized your player before calling `addMediaMetrics`.
```js theme={"theme":{"light":"github-light","dark":"dark-plus"}}
import { addMediaMetrics } from "@livepeer/core-web/browser";
const video = document.getElementById("my-video");
const { destroy } = addMediaMetrics(ref.current);
// or, you can *optionally* pass options to the addMediaMetrics function
const { destroy } = addMediaMetrics(ref.current, {
// specify the source URL of the video, which should include a playbackId.
// this should only be used when using a custom video player that sets a `blob:...` URL or no `src` on the video element.
src: "https://livepeercdn.studio/hls/{playbackId}/index.m3u8",
// specify a unique viewer ID for tracking purposes
viewerId: "user123",
// monitor when the metrics fails to report
onError: (error) => {
console.error("Metrics collection error:", error);
},
});
```
Make sure you have initialized your player before calling `addMediaMetrics`.
```tsx theme={"theme":{"light":"github-light","dark":"dark-plus"}}
import { addMediaMetrics } from "@livepeer/core-web/media/browser";
import React, { useEffect, useRef, useState } from "react";
const source = "https://livepeercdn.studio/hls/{playbackId}/index.m3u8";
export default function VideoPlayer() {
const ref = useRef(null);
useEffect(() => {
const { destroy } = addMediaMetrics(ref.current, {
// specify the source URL of the video, which should include a playbackId.
// this should only be used when using a custom video player that sets a `blob:...` URL or no `src` on the video element.
src: source,
// specify a unique viewer ID for tracking purposes
viewerId: "user123",
// monitor when the metrics fails to report
onError: (error) => {
console.error("Metrics collection error:", error);
},
});
return () => destroy();
}, []);
return (
);
}
```
## Retrieving views from the Dashboard
The Livepeer Studio Dashboard is a frontend interface for publishing live or
on-demand video streams with no code. In this guide, we'll show you how to use
the dashboard to retrieve viewership metrics.
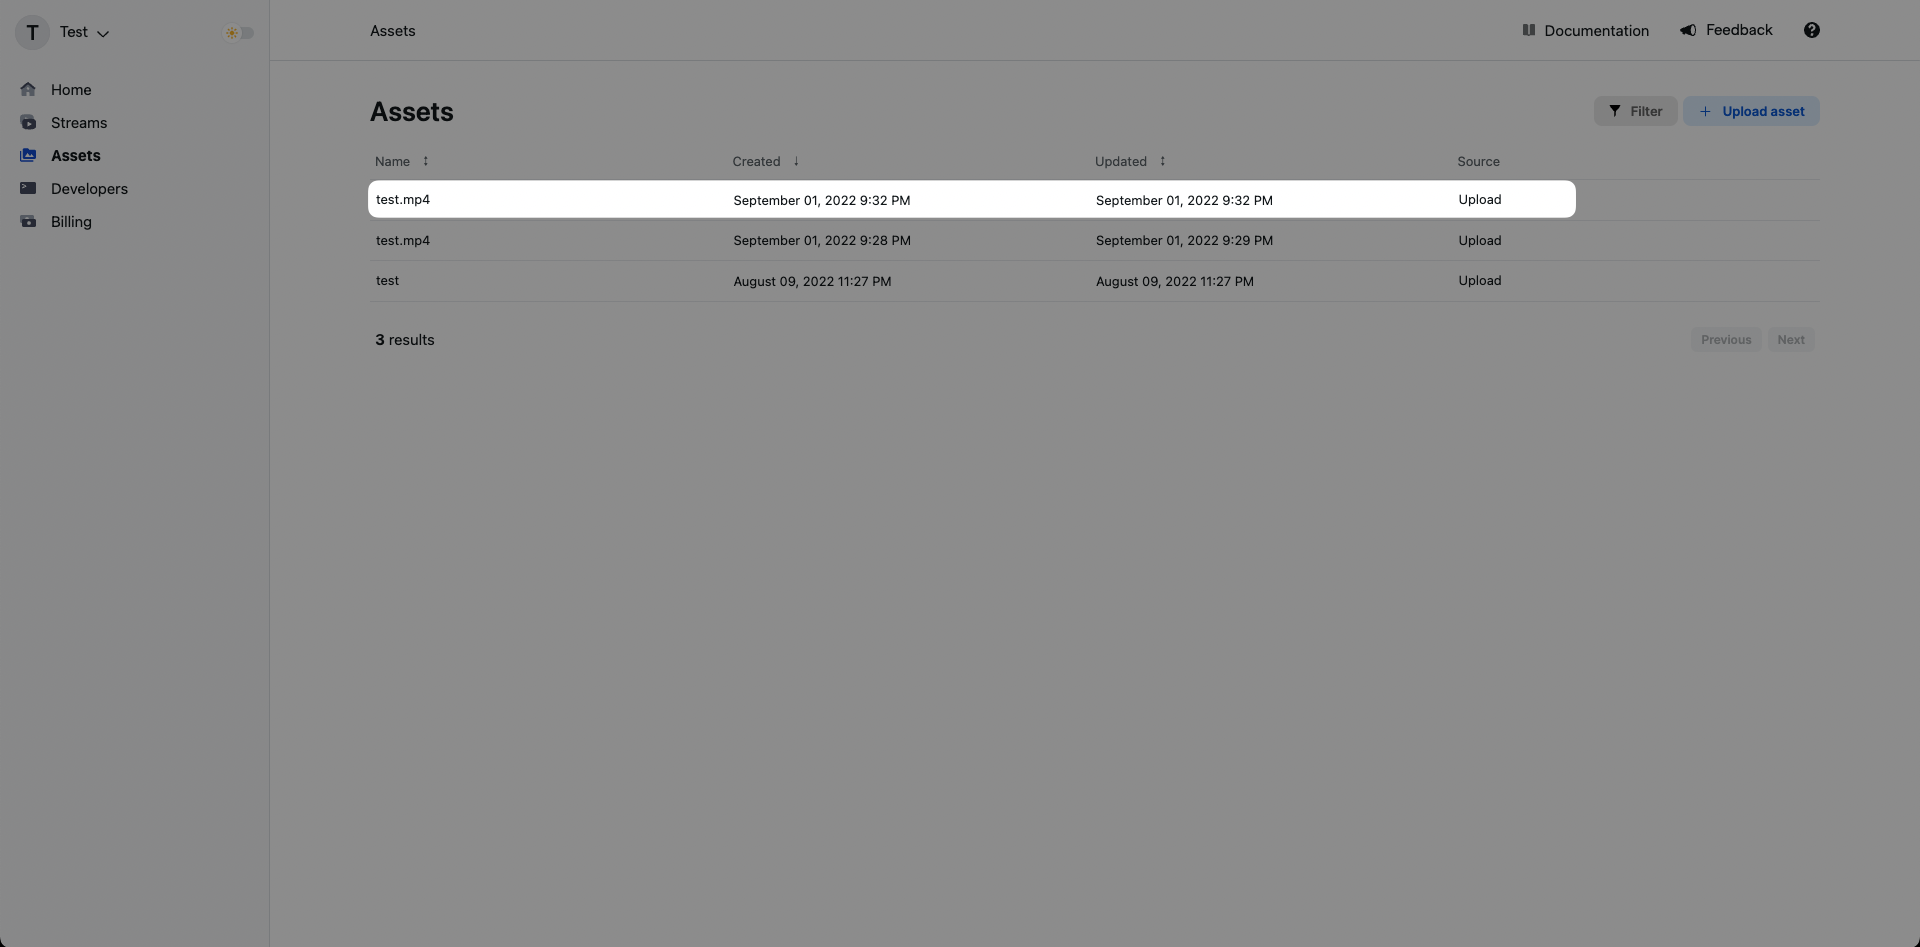
### Navigate to the assets page
 ### Click on an existing asset
Click on an existing asset and you'll be brought to that asset's specific
details page. If you haven't created an asset yet, you can follow the
[upload a video asset guide](/developers/guides/upload-video-asset).
### Click on an existing asset
Click on an existing asset and you'll be brought to that asset's specific
details page. If you haven't created an asset yet, you can follow the
[upload a video asset guide](/developers/guides/upload-video-asset).
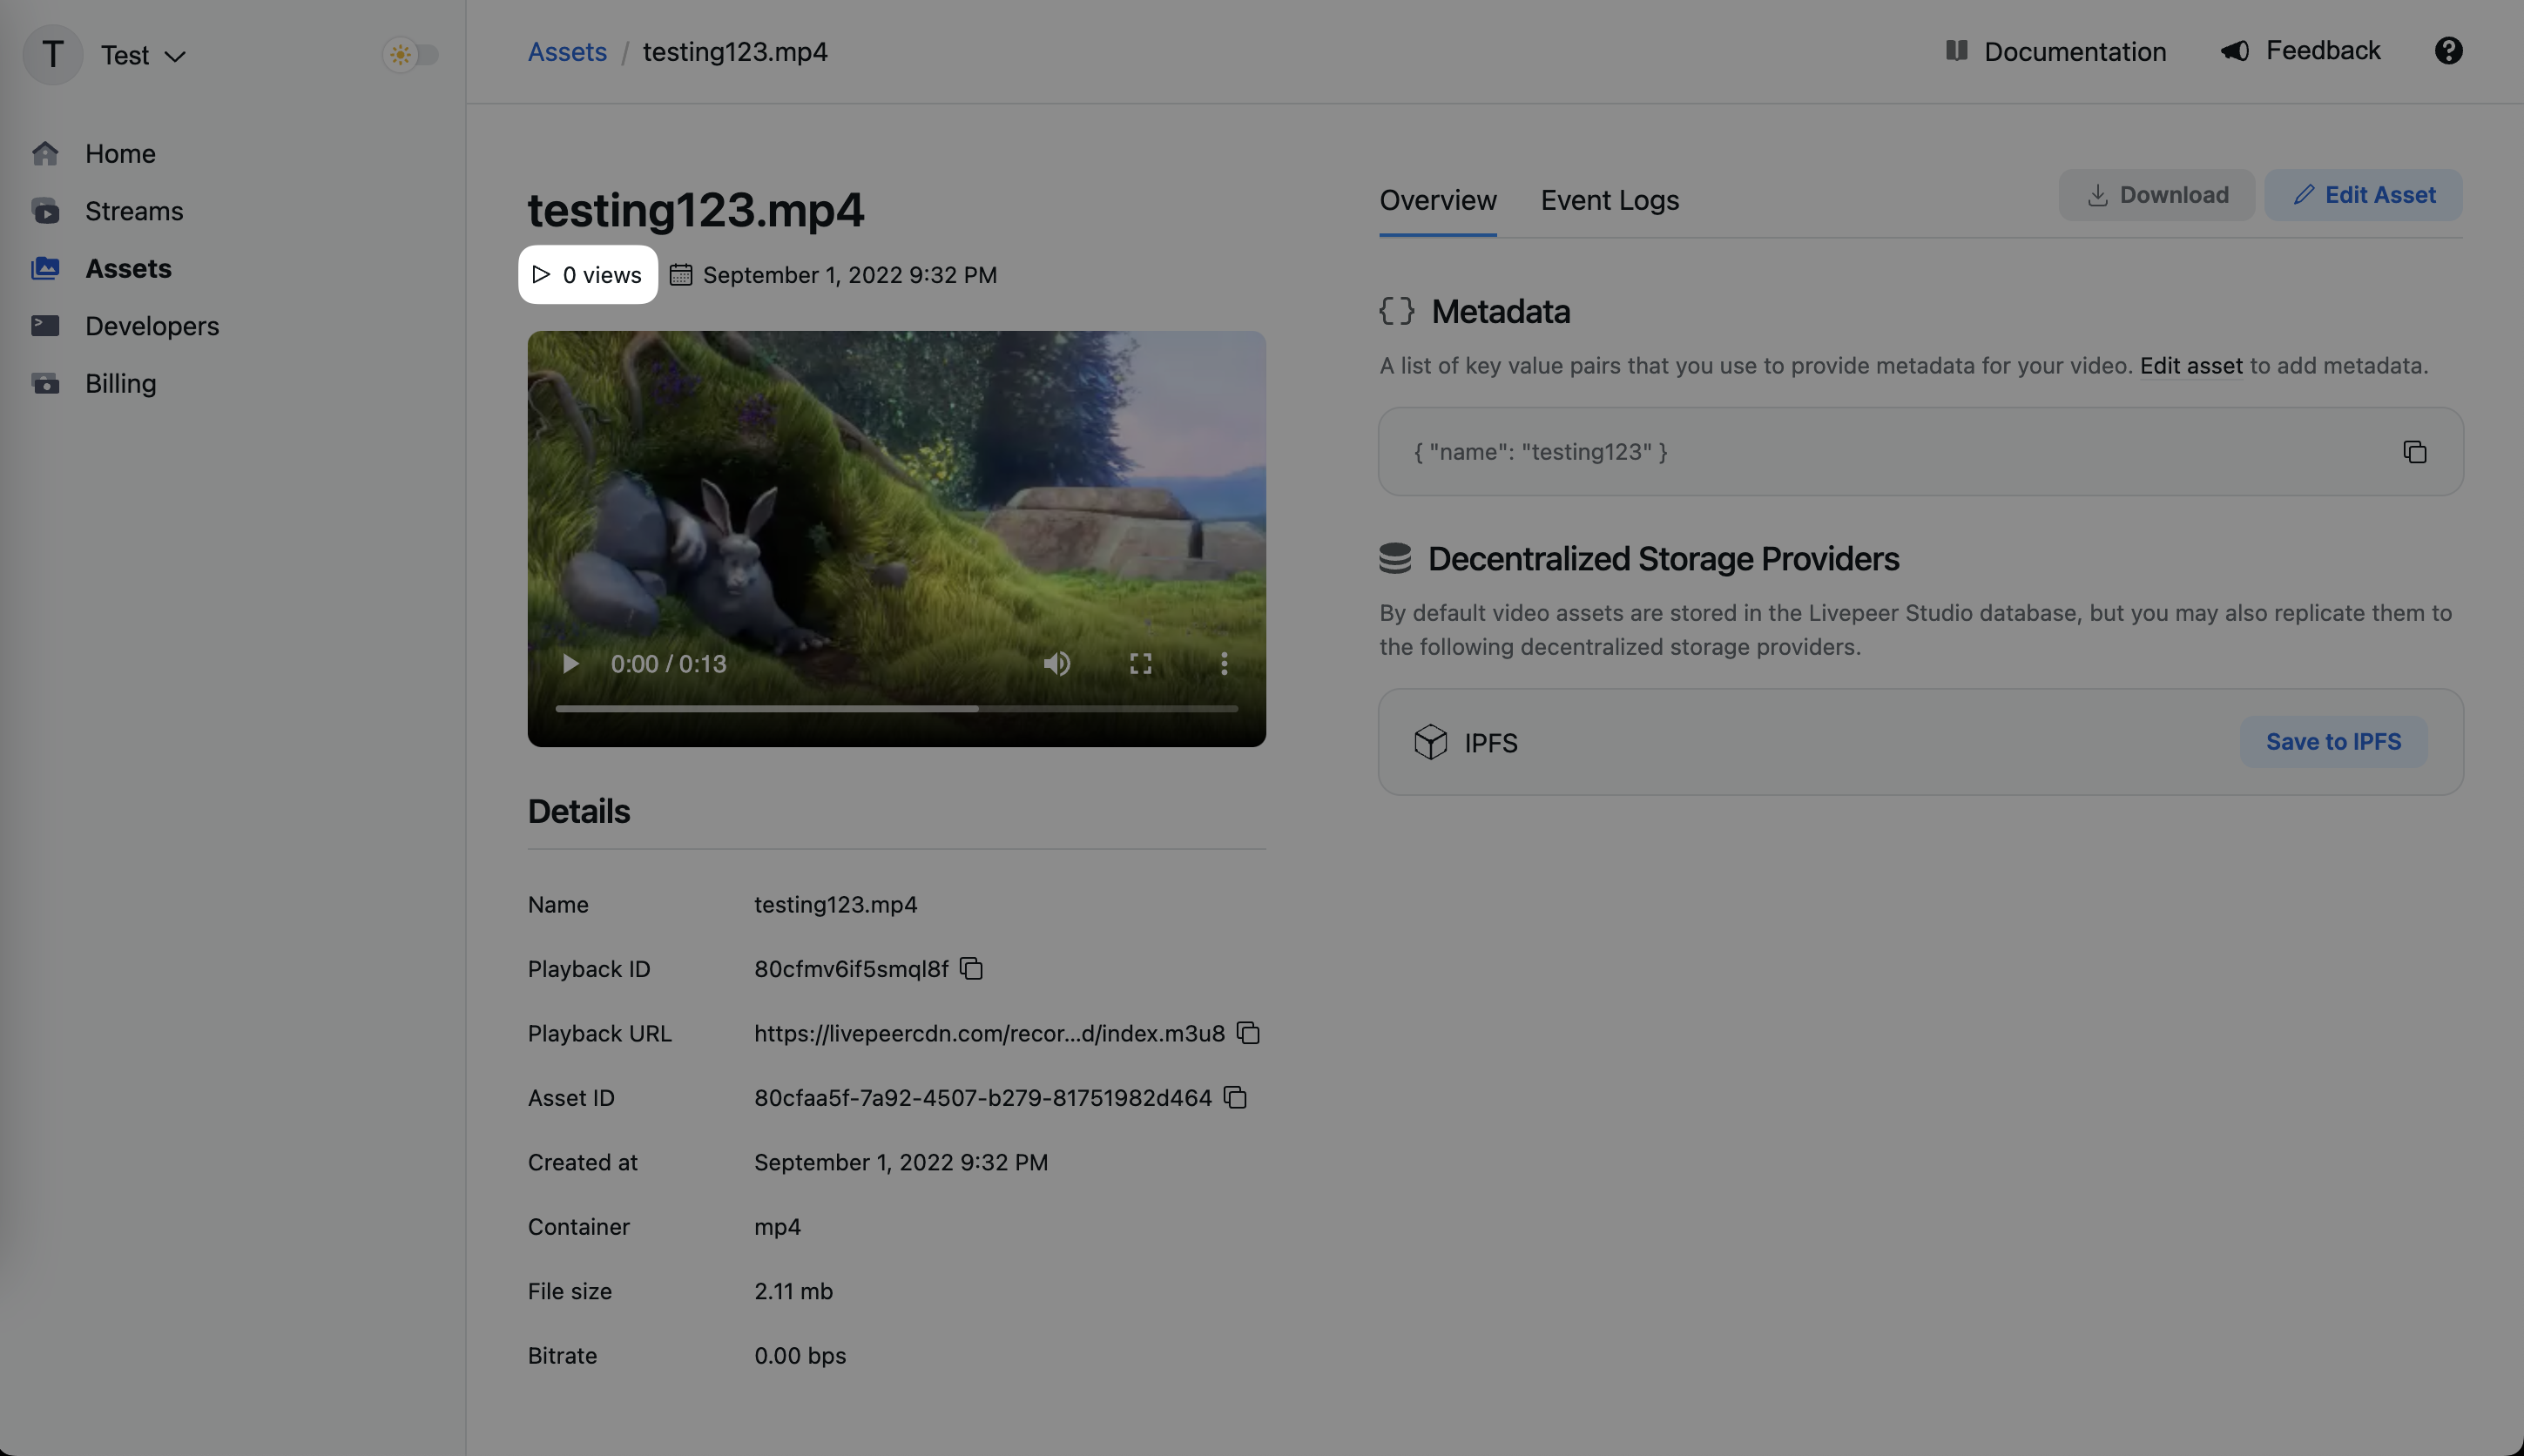
 ### View your asset's viewership metrics
In the asset's specific detail page you can view its total number of views.
### View your asset's viewership metrics
In the asset's specific detail page you can view its total number of views.
 ## Retrieving views from the API
### Get the `playbackId` of an existing stream/asset
Get the `playbackId` of an existing asset. A `playbackId` can be found in the
stream/asset page on the dashboard or from any Asset API call. If you haven't
created a stream/asset yet, you can follow the
[upload a video asset guide](/developers/guides/upload-video-asset).
The `playbackId` can be a canonical playback ID from a specific Livepeer asset
or stream objects, or dStorage identifiers for assets. Queries by dStorage ID
are universal/cross-account, as explained below, so check what makes the most
sense for your app.
When querying by dStorage ID (e.g. `ipfs://` or `ar://` URLs, or CID/txID), you
will get views for all assets with that dStorage ID across any Livepeer account.
This is useful to display global metrics from a video. To display the viewership
metrics only from the videos in your account, use the API objects `playbackId`.
### Retrieve viewership data
Once you have the `playbackId`, you can make a request to get the viewership
data.
```sh theme={"theme":{"light":"github-light","dark":"dark-plus"}}
curl --request GET \
--url https://livepeer.studio/api/data/views/query/total/{playbackId} \
--header 'Authorization: Bearer '
```
For more information on the API and SDK methods, refer to the [API
reference](/api-reference/viewership/get-public-total-views).
### Diving deeper
If you're happy with the above metrics you can stop here. If you want to build
more advanced analytics, you can use the following API endpoints to get more
detailed data.
#### [Realtime Viewership API](/api-reference/viewership/get-realtime-viewership)
This API can be called from the frontend to retrieve realtime engagement metrics
(current view count and error rate). You can break down the results by playback
id, browser, device, and country.
```sh theme={"theme":{"light":"github-light","dark":"dark-plus"}}
curl --request GET \
--url 'https://livepeer.studio/api/data/views/now?playbackId=playback_id&breakdownBy%5B%5D=browser' \
--header 'Authorization Bearer '
```
For more information on the API and SDK methods, refer to the [API
reference](/api-reference/viewership/get-realtime-viewership).
#### [Creator metrics API](/api-reference/viewership/get-creators-metrics)
This API can be called from the frontend to retrieve detailed engagement metrics
for a specific resource. The only restriction it has is that it has to be called
with an `assetId` or `streamId` values, which are private values today that only
the asset creator should have access. Soon this creator ownership will be
validated using wallet signatures instead.
The idea for this API is to build creator analytics dashboards. It can be called
from the frontend and can provide detailed insights to creators about their
assets and streams.
```sh theme={"theme":{"light":"github-light","dark":"dark-plus"}}
curl --request GET \
--url 'https://livepeer.studio/api/data/views/query/creator?from=from&to=to&timeStep=day&assetId=asset_id_here&breakdownBy%5B%5D=browser' \
--header 'Authorization: Bearer '
```
For more information on the API and SDK methods, refer to the [API
reference](/api-reference/viewership/get-creators-metrics).
#### [All metrics API](/api-reference/viewership/get-usage-metrics)
This API can be called from the backend to retrieve detailed engagement metrics
for a specific resource. It requires a non-CORS API key to be used, meaning that
it cannot be called from the frontend. This is for security reasons since this
API provides full access to all metrics in the account, meaning it provides the
most flexibility in queries.
The idea is that developers should build their own abstraction and access
control logics on top of this API and abstract it as higher level API in their
apps.
```sh theme={"theme":{"light":"github-light","dark":"dark-plus"}}
curl --request GET \
--url 'https://livepeer.studio/api/data/usage/query?timeStep=hour&breakdownBy%5B%5D=creatorId&from=from&to=to' \
--header 'Authorization: Bearer '
```
For more information on the API and SDK methods, refer to the [API
reference](/api-reference/viewership/get-usage-metrics).
### Visualizing Your Data
If you are ready to take a deep dive into your data, then visualizations are the
next step. We have put together a tutorial complete with templates to get you
started.
#### Visualize Engagement Metrics with Grafana
If you are interested in visualizing your engagement metrics with Grafana, feel
free to check out our tutorial,
[Visualize Engagement Metrics with Grafana](/developers/guides/get-engagement-analytics-via-grafana),
to learn more.
## Retrieving views from the API
### Get the `playbackId` of an existing stream/asset
Get the `playbackId` of an existing asset. A `playbackId` can be found in the
stream/asset page on the dashboard or from any Asset API call. If you haven't
created a stream/asset yet, you can follow the
[upload a video asset guide](/developers/guides/upload-video-asset).
The `playbackId` can be a canonical playback ID from a specific Livepeer asset
or stream objects, or dStorage identifiers for assets. Queries by dStorage ID
are universal/cross-account, as explained below, so check what makes the most
sense for your app.
When querying by dStorage ID (e.g. `ipfs://` or `ar://` URLs, or CID/txID), you
will get views for all assets with that dStorage ID across any Livepeer account.
This is useful to display global metrics from a video. To display the viewership
metrics only from the videos in your account, use the API objects `playbackId`.
### Retrieve viewership data
Once you have the `playbackId`, you can make a request to get the viewership
data.
```sh theme={"theme":{"light":"github-light","dark":"dark-plus"}}
curl --request GET \
--url https://livepeer.studio/api/data/views/query/total/{playbackId} \
--header 'Authorization: Bearer '
```
For more information on the API and SDK methods, refer to the [API
reference](/api-reference/viewership/get-public-total-views).
### Diving deeper
If you're happy with the above metrics you can stop here. If you want to build
more advanced analytics, you can use the following API endpoints to get more
detailed data.
#### [Realtime Viewership API](/api-reference/viewership/get-realtime-viewership)
This API can be called from the frontend to retrieve realtime engagement metrics
(current view count and error rate). You can break down the results by playback
id, browser, device, and country.
```sh theme={"theme":{"light":"github-light","dark":"dark-plus"}}
curl --request GET \
--url 'https://livepeer.studio/api/data/views/now?playbackId=playback_id&breakdownBy%5B%5D=browser' \
--header 'Authorization Bearer '
```
For more information on the API and SDK methods, refer to the [API
reference](/api-reference/viewership/get-realtime-viewership).
#### [Creator metrics API](/api-reference/viewership/get-creators-metrics)
This API can be called from the frontend to retrieve detailed engagement metrics
for a specific resource. The only restriction it has is that it has to be called
with an `assetId` or `streamId` values, which are private values today that only
the asset creator should have access. Soon this creator ownership will be
validated using wallet signatures instead.
The idea for this API is to build creator analytics dashboards. It can be called
from the frontend and can provide detailed insights to creators about their
assets and streams.
```sh theme={"theme":{"light":"github-light","dark":"dark-plus"}}
curl --request GET \
--url 'https://livepeer.studio/api/data/views/query/creator?from=from&to=to&timeStep=day&assetId=asset_id_here&breakdownBy%5B%5D=browser' \
--header 'Authorization: Bearer '
```
For more information on the API and SDK methods, refer to the [API
reference](/api-reference/viewership/get-creators-metrics).
#### [All metrics API](/api-reference/viewership/get-usage-metrics)
This API can be called from the backend to retrieve detailed engagement metrics
for a specific resource. It requires a non-CORS API key to be used, meaning that
it cannot be called from the frontend. This is for security reasons since this
API provides full access to all metrics in the account, meaning it provides the
most flexibility in queries.
The idea is that developers should build their own abstraction and access
control logics on top of this API and abstract it as higher level API in their
apps.
```sh theme={"theme":{"light":"github-light","dark":"dark-plus"}}
curl --request GET \
--url 'https://livepeer.studio/api/data/usage/query?timeStep=hour&breakdownBy%5B%5D=creatorId&from=from&to=to' \
--header 'Authorization: Bearer '
```
For more information on the API and SDK methods, refer to the [API
reference](/api-reference/viewership/get-usage-metrics).
### Visualizing Your Data
If you are ready to take a deep dive into your data, then visualizations are the
next step. We have put together a tutorial complete with templates to get you
started.
#### Visualize Engagement Metrics with Grafana
If you are interested in visualizing your engagement metrics with Grafana, feel
free to check out our tutorial,
[Visualize Engagement Metrics with Grafana](/developers/guides/get-engagement-analytics-via-grafana),
to learn more.